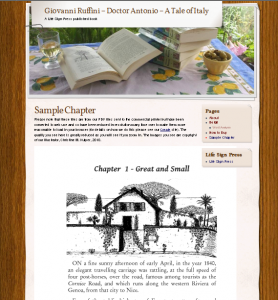
For our Doctor Antonio sample chapter page here are the steps we did to create that page of images to emulate a sample of the chapter.
This instruction is done on a Ubuntu GNU/Linux desktop but something similar can be done with Microsoft Windows based machine. We have provided notes at the end of this page to help you overcome differences in operating systems.
To get started you firstly need to pick which chapter. We have simply started with chapter 1.
1) Copy in the desired sample chapter PDF file to a new directory location on your PC where you will be working from and where you will be saving all your sample chapter images.
2) Print to Postscript through this process,
i) On the document server in the Document Viewer then select the File -> Print and then select “Print to file” and in that box check the “Postscript” (ps) option under the General tab. Give it a suitable name e.g. mybooksample.ps
ii) In the Printing dialog Page Setup tab set the page size to Custom Size 1 of h 217 x w 140 Portrait
iii) In Page Handling tab select “Shrink to printable area”
iv) Do Print Preview and Print if it is OK.
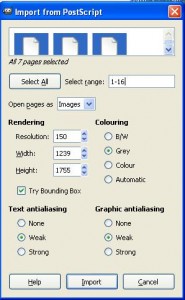
3) Now go to the newly created .ps file and right-mouse and open in GIMP. In the GIMP importer check as follows,
- Select All
- Open As Images (it will open e.g. 16 images for 16 pages of the chapter)
- Resolution is 150 (leave pixel settings)
- Colouring is Grey
- Check “Try bounding box”
- Check both Text and Graphic antialiasing as “Weak”
The ‘n’ images will be created one for each page and each around 827×1283 pixels for that document size and will all be open in GIMP.
4) Save each image in GIMP as follows, File -> Save tfor web (if this option doesn’t exist then you need to install the Save for web plugin). Check the…
- PNG-8
- Use web optimized palette
and then do save.
Give it a filename e.g. samplegXX.png, where XX increments from 01 to 16 for a 16 page chapter.
Repeat that for every page of the chapter. Each page will be a very compressed but readable and nice looking image.
You can add this image to a post or page as normal though for our Doctor Antonio we created a Sample chapter that had all pages in turn. The WordPress media File upload will add all the images you select at once. You get the first page in as you want using the ordinary WordPress post editor and then use the HTML editor mode in WordPress to copy and paste this first image as an example, changing the page number (which is in the file name) one by one until the whole chapter is done.
At the start of the WordPress page detail any special copyrights (as normally these will be on the book’s copyright page but will now be missing). Then no one has any excuses if they scrape your page and re-use any images.
Technology used:
Ubuntu 10.10 desktop
the GNOME Evince document viewer.
GIMP with Save For Web plugin.
Both Evince and GIMP are available for Windows though this was only tested on Ubuntu GNU/Linux. If you are working with Postscript in Windows then you will need to install Ghostscript. The easiest way to do this is by installing the PDFCreator program from here which has Ghostscript built into it. PDFCreator creates a virtual printer that makes both PDFs and .ps (postscript files). From Adobe Acrobat reader you can print to that “printer” but if you check the option “Save to file” then it automatically creates a .ps Postscript file.
The GIMP save-for-web plugin gives you the easy-to-use dialog box that allows a quick selection of options that are intended to compress the files for web site use. You can download this plugin from here.


